Enterprise Recon 2.14.0
How To Install the Master Server Appliance on Hyper-V
This guide provides general instructions for installing the
ER2 Master Server on
a new virtual machine in Hyper-V. The instructions may need to be adjusted to match your
specific Hyper-V release and/or version.
This chapter describes how to create a virtual machine in Hyper-V and install the ER2 Master Server on it.
Preparing to Install
- Install Hyper-V. See Microsoft Learn: Install Hyper-V on Windows 10 for more information.
- See System Requirements for information on ER2 requirements.
- Download the ER2 installer.
- (Optional) Backup the Master Server and Network Settings.
Creating a New Virtual Machine
- Open the Hyper-V Manager and select a server.
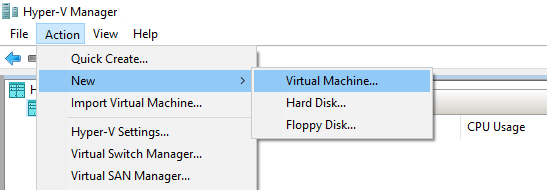
- From the Action menu, click New > Virtual Machine…. This
opens up the New Virtual Machine Wizard.

- In the Before You Begin window, click Next.
- In the Specify Name and Location window, configure the following fields:
- Name: Enter a descriptive name for the virtual machine. For example, er2.x.x-master-server.
- Store the virtual machine in a different location: (Optional) Select to change the location on which to create and store the files for the new virtual machine.
- Location: Enter a custom location to store the virtual machine files.
- Click Next.
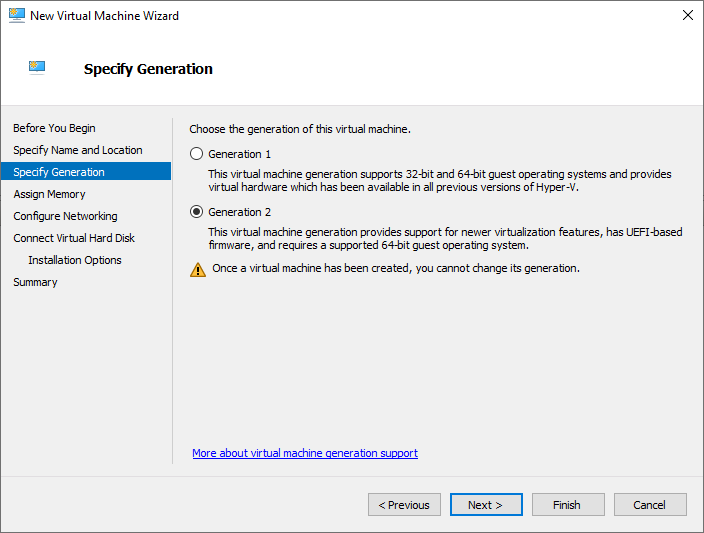
- In the Specify Generation window, select Generation 2 and click
Next.

- In Assign Memory window, allocate a suitable amount of memory to this virtual machine based on the Master Server's System Requirements. Click Next.
- In the Configure Networking window, select the network adapter for the virtual machine. Click Next.
- In the Connect Virtual Hard Disk window, select Create a virtual hard
disk and configure the following fields:
- Name: Assign a name to the virtual hard disk.
- Location: Select a location on which to store the virtual hard disk.
- Size: Allocate a suitable amount of disk space to this virtual machine based on the Master Server's System Requirements. Click Next.
- In the Installation Options window, select Install an operating system from a bootable image file. Click on Browse and select the ISO installer that was downloaded from the Ground Labs Services Portal. Click Next.
- In the Completing the New Virtual Machine Wizard window, review the details of the new virtual machine.
- Click Finish. Your new virtual machine will appear in the Virtual Machines section for your selected server.
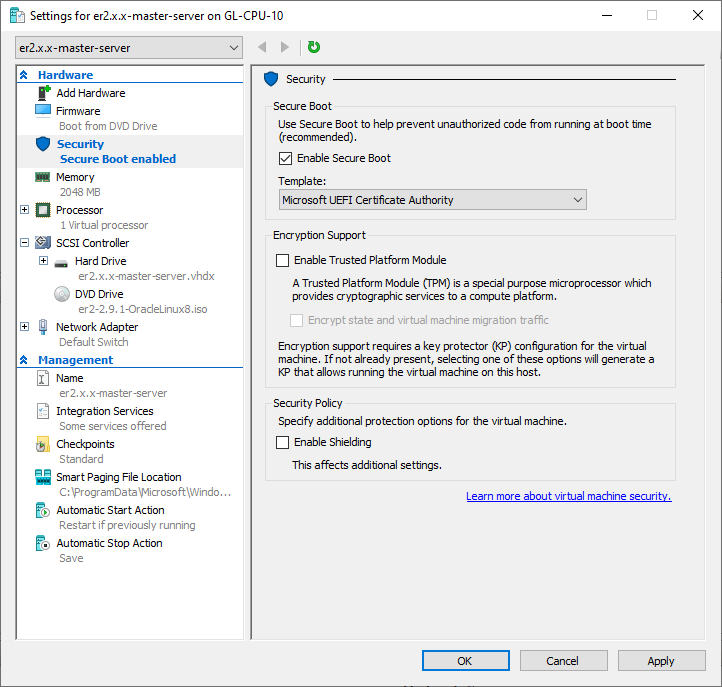
- Right click on your new virtual machine and click Settings.
- Go to Hardware > Security. In the Secure Boot > Template:
dropdown, select Microsoft UEFI Certificate Authority.

- Click Apply and OK.
Installing ER2 on the Virtual Machine
- To start installing ER2, double click on your new virtual machine and select Start.
- Follow the instructions to Install the Master Server Appliance from ISO.