
Enterprise Recon 2.16.0
Azure
This section covers the following topics:
Azure Cosmos DB
Licensing
All scanned Azure Cosmos DB Targets consume data from the Sitewide License data allowance limit.
See Target Licenses for more information.
Requirements
| Requirements | Description |
|---|---|
| Proxy Agent |
|
| TCP Allowed Connections | Port 443 |
Configure Azure Cosmos DB Credentials
Azure Cosmos DB target can be authenticated using any of the three methods:
- Master key
To authenticate via master key, you must: - Microsoft Entra ID - Client Secret (AAD)
To authenticate via client secret, you must: - Microsoft Entra ID - Client Certificate (AAD)
To authenticate via client certificate, you must:
Get Azure Cosmos DB Account Access Keys
- Log in to your Azure account and go to your Azure Cosmos DB account page.
- Under Settings, click Keys.
-
Note down the Primary Key and Secondary Key. Use the active access key to connect ER2 to your Azure Cosmos DB account.
Only one access key can be active at a time. The primary and secondary access keys are used to make rolling key changes. Ask your Azure Cosmos DB account administrator which access key is currently active, and use that key with ER2.
Generate Client ID and Tenant ID Key
- With your administrator account, log in to the Azure app registration portal.
- In the App registrations page, click + New registration.
-
In the Register an application page, fill in the following fields:
Field Description Name Enter a descriptive display name for ER2. For example, Enterprise Recon. Supported account types Select Accounts in this organizational directory only. - Click Register. You will be redirected to the Overview page for the newly registered app, Enterprise Recon.
-
Take down the Application (client) ID and Directory (tenant) ID.
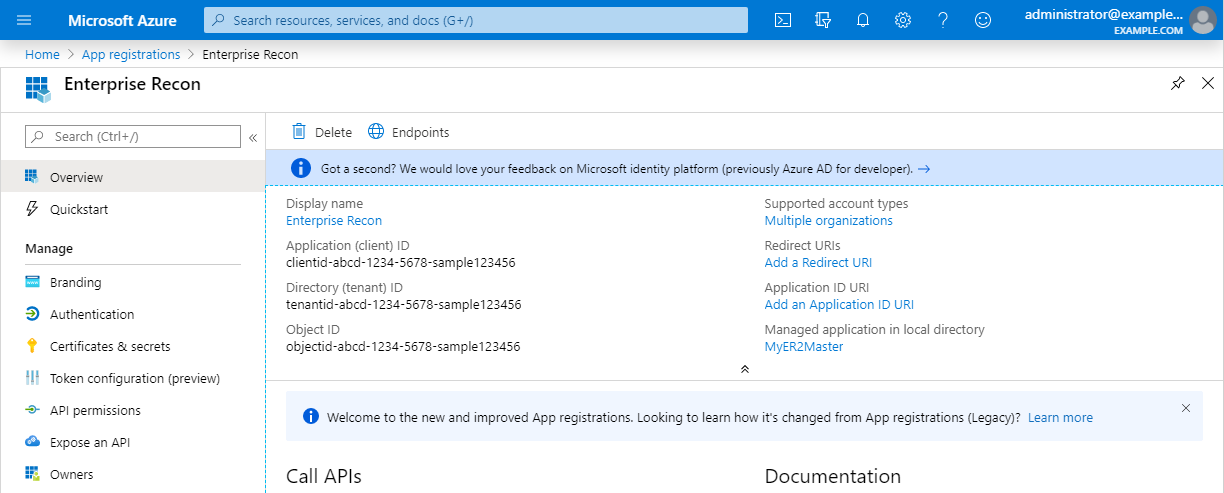
Generate Client Secret Key
- With your administrator account, log in to the Azure app registration portal.
- In the App registrations page, go to the Owned applications tab. Click on the app that you registered (e.g. Enterprise Recon) when generating the Client ID and Tenant ID key.
- In the Manage panel, click Certificates & secrets.
- In the Client secrets section, click + New client secret.
-
In the Add a client secret page, fill in the following fields:
Field Description Description Enter a descriptive label for the Client Secret key. Expires Select a validity period for the Client Secret key. -
Click Add. The Value column will contain the Client Secret key.
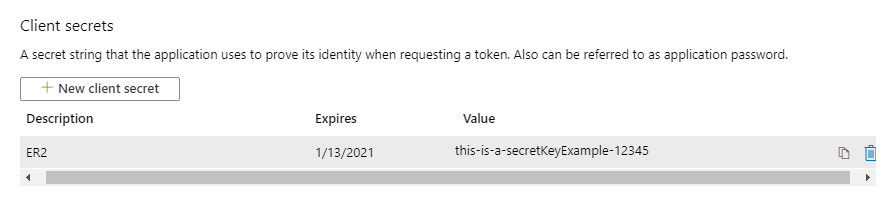
-
Copy and save the Client Secret key to a secure location.
Save your Client Secret key in a secure location. You cannot access this Client Secret key once you navigate away from the page.
Generate a Client Certificate
-
Obtain Signed SSL Certificate or generate a self-signed certificate by running the following commands:
# Generate a new private key with passphrase
# Syntax: openssl genrsa -aes256 -out <private-key-filename>.pem 2048
openssl genrsa -aes256 -out private-key.pem 2048
Alternative: Generate a new private key without passphrase
openssl genrsa -out private-key.pem 2048

# Generate certificate and provide the details for the certificate when prompted
# Where <private-key-file> is the newly generated private key from the previous command
# Syntax: openssl req -new -x509 -sha256 -days 365 -key <private-key>.pem -out <public-cert-filename>.pem
openssl req -new -x509 -sha256 -days 365 -key private-key.pem -out public-cert.pem
The SSL certificate and the private key must be PEM files. If in different format, please convert them to .pem format before proceeding. -
Upload the certificate to your registered application.
- With your administrator account, log in to the Azure app registration portal.
- In the App registrations page, go to the Owned applications tab.
- Click on the app that you registered (e.g. Enterprise Recon) when generating the Client ID and Tenant ID key.
- In the Manage panel, click Certificates & secrets.
- In the Certificates section, click Upload certificate.
- From the dropdown, select your certificate in PEM format.
- In the Description field, enter a description for the certificate.
- Click Add.
Set up Azure Cosmos DB as a Target
To add an Azure Cosmos DB Target:
- From the New Scan page, Add Targets.
- In the Select Target Type dialog box, click on Azure and select Azure Cosmos DB.
-
Fill in the following fields:
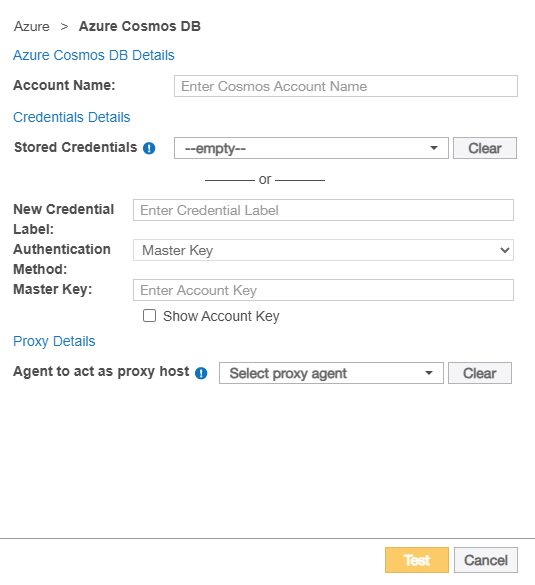
Field Description Account Name Enter the Azure Cosmos DB account name.
Example: mysqlaccount
New Credential Label Enter a descriptive label for the Azure Cosmos DB credential set.
Authentication Method If authenticating with master key: - From the dropdown, select Master Key.
- In the Master Key field, enter the master key. See Get Azure Cosmos DB Account Access Keys.
- Ensure the Service Principal has been assigned the required Cosmos DB Data-Plane RBAC role. See the cloud service provider's official documentation.
- From the dropdown, select Client Secret (AAD).
- In the New Client ID field, enter the client ID.
Example: clientid-1234-5678-abcd-6d05bf28c2bf
See Generate Client ID and Tenant ID Key for more information.
- In the New Client Secret field, enter the client secret key.
Example: client~secret.key-CHvV1B5YQfr~6zDjEyv
See Generate Client ID and Tenant ID Key for more information.
- In the Tenant ID field, enter the tenant ID.
Example: tenantid-1234-abcd-5678-02011df316f4
See Generate Client ID and Tenant ID Key for more information.
- Ensure the Service Principal has been assigned the required Cosmos DB Data-Plane RBAC role. See the cloud service provider's official documentation.
- From the dropdown, select Client Certificate (AAD).
- In the New Client ID field, enter the client ID.
Example: clientid-1234-5678-abcd-6d05bf28c2bf
See Generate Client ID and Tenant ID Key for more information.
- In the PEM File (cert + private key) field, upload the
private key (*.pem) file.
See Generate Client Certificate for more information.
- In the Tenant ID field, enter the tenant ID.
Example: tenantid-1234-abcd-5678-02011df316f4
See Generate Client ID and Tenant ID Key for more information.
Agent to act as proxy host Select a Windows, Linux or macOS Proxy Agent host with direct Internet access.
- Click Test. If ER2 can connect to the Target, the button changes to a Commit button.
- Click Commit to add the Target.
Edit Azure Cosmos DB Target Path
To scan a specific Target location in Azure Cosmos DB:
- Set up Azure Cosmos DB as a Target.
- In the Select Locations section, select your Azure Cosmos DB Target location and click Edit.
-
In the Edit Azure Cosmos DB Location dialog box, enter the Path to scan. Use the following syntax:
Location Path syntax All locations Leave blank. All databases in the account name dbs Colls identifier for containers dbs\<database_name> All containers in the database dbs\<database_name>\colls Specific container dbs\<database_name>\colls\<container_name> - Click Test and then Commit to save the path to the Target location.
Azure Storage
Overview
The instructions here work for setting up the following Azure Storage types as Targets:
- Azure Blobs
- Azure Tables
- Azure Queues
To set up Azure Storage as a Target:
To scan specific paths in an Azure Storage Target, see Edit Azure Storage Target Path.
Licensing
All scanned Azure Storage Targets consume data from the Sitewide License data allowance limit.
See Target Licenses for more information.
Requirements
| Requirements | Description |
|---|---|
| Proxy Agent |
|
| TCP Allowed Connections | Port 443 |
Get Azure Account Access keys
- Log in to your Azure account.
- Go to All resources > [Storage account], and under Settings, click on Access keys.
-
Note down key1 and key2 which are your primary and secondary access keys respectively. Use the active access key to connect ER2 to your Azure Storage account.
Only one access key can be active at a time. The primary and secondary access keys are used to make rolling key changes. Ask your Azure Storage account administrator which access key is currently active, and use that key with ER2.
Set up Azure as a Target Location
- From the New Scan page, Add Targets.
- In the Select Target Type dialog box, click on Azure Storage and select one of the following Azure Storage types:
- Azure Blobs
- Azure Queue
- Azure Table
-
Fill in the following fields:
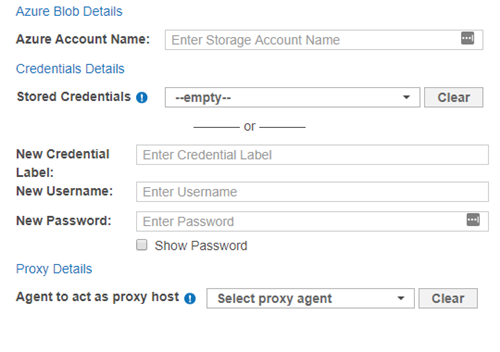
Field Description Azure Account Name Enter your Azure account name. New Credential Label Enter a descriptive label for the credential set. New Username Enter your Azure Storage account name. New Password Enter either key1 or key2. See Get Azure Account Access Keys for more information. Agent to act as proxy host Select a Proxy Agent host with direct Internet access. Recommended Least Privilege User ApproachTo reduce the risk of data loss or privileged account abuse, the Target credentials provided for the intended Target should only be granted read-only access to the exact resources and data that require scanning. Never grant full user access privileges or unrestricted data access to any application if it is not required.
- Click Test. If ER2 can connect to the Target, the button changes to a Commit button.
- Click Commit to add the Target.
Edit Azure Storage Target Path
To scan a specific Target location in Azure Storage:
- Set up Azure Storage as a Target.
- In the Select Locations section, select your Azure Storage Target location and click Edit.
-
In the Edit Azure Storage Location dialog box, enter the Path to scan. Use the following syntax:
Azure Storage type Path syntax Azure Blobs To scan a specific folder:
<folder_name>
To scan a specific file:
<[folder_name/]file_name.txt>Azure Table To scan a specific table:
<table_name>Azure Queue To scan a specific Queue:
<queue_name> - Click Test and then Commit to save the path to the Target location.