
Enterprise Recon 2.16.1
Databricks
This section covers the following topics:
- Overview
- Licensing
- Requirements
- Configure Databricks Authentication Credentials
- Set Up and Scan a Databricks Target
- Edit Databricks Target Path
- Databricks Remediation
- Scan Costs for Databricks Targets
Overview
When Databricks is added as a scan Target, ER2 returns all Delta Tables, Views, and Databricks Volumes.
Scanning Databricks Tables and Views runs queries on a SQL warehouse in your Databricks workspace. Databricks bills warehouse usage for the time the warehouse is running, at an hourly rate determined by its size, not by the amount of data read.
For more information, see Scan Costs for Databricks Targets.
Example of Databricks structure:
Databricks [workspace URL: example.azuredatabricks.net]
    +- Databricks on target EXAMPLE.AZUREDATABRICKS.NET
        +- Delta Tables
            +- Catalog 1
                +- Schema 1
                    +- Table 1
                    +- Table 2
        +- Views
            +- Catalog 1
                +- Schema 1
                    +- View 1
                    +- View 2
        +- Databricks Volumes
            +- Catalog 1
                +- Schema 1
                    +- Volume 1
                        +- Folder 1
                            +- File 1
                            +- File 2
                            +- File 3
                        +- Folder 2
                            +- File 1
Licensing
All scanned Databricks Targets consume data from the Sitewide License data allowance limit.
See Target Licenses for more information.
Requirements
| Requirements | Description |
|---|---|
| Proxy Agent |
|
| TCP Allowed Connections | Port 443 |
Configure Databricks Authentication Credentials
Databricks target can be authenticated using any of the three methods:
- Service Principal (Databricks native)
To authenticate via Databricks native, you must: - Service Principal (via Microsoft Entra ID)
To authenticate via Microsoft Entra ID, you must: - Personal Access Token
To authenticate via Personal Access Token, you must:
Generate Client ID and Client Secret Keys via Databricks Native
- With your workspace admin account, login to Databricks workspace.
- Click your username and select Settings.
- Click the Identity and access tab.
- Next to Service principals, click Manage.
- Select the service principal, then click the Secrets tab.
- Click Generate secret.
- Set the secret’s lifetime in days (maximum 730 days).
- Under Scopes, deselect all-apis, then select the following API scopes:
- sql
- unity-catalog
- files (if scanning volumes)
- authentication (only if the Generate a personal access token for each scan is enabled when you set up and scan a Databricks target)
- Click Generate.
-
Copy the displayed Secret and Client ID, then click Done. The client ID is the same as the service principal’s application ID.
Save your Client Secret key in a secure location. You cannot access this Client Secret key once you navigate away from the page.
Generate Client ID, Tenant ID and Client Secret Keys via Microsoft Entra
- With your administrator account, log in to the Azure app registration portal.
- In the App registrations page, click + New registration.
-
In the Register an application page, fill in the following fields:
Field Description Name Enter a descriptive display name for ER2. For example, ER2 Databricks. Supported account types Select Accounts in this organizational directory only. - Click Register. You will be redirected to the Overview page for the newly registered app, ER2 Databricks.
-
Take down the Application (client) ID and/or Directory (tenant) ID (if authenticating via Microsoft Entra ID).
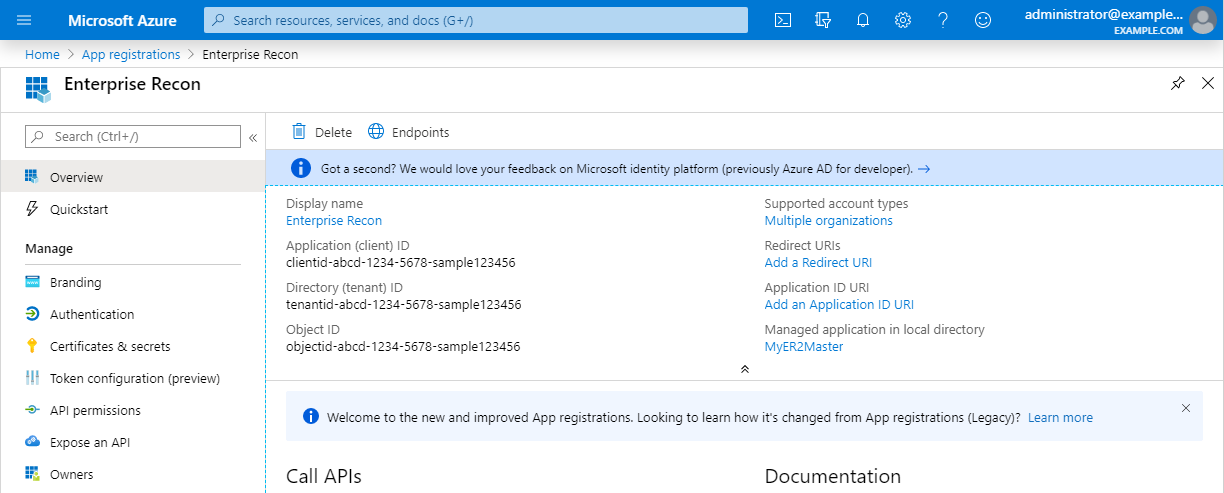
- In the App registrations page, go to the Owned applications tab. Click on the app that you registered (e.g. ER2 Databricks) when you generated the Client ID and Tenant ID key.
- In the Manage panel, click Certificates & secrets.
- In the Client secrets section, click + New client secret.
-
In the Add a client secret page, fill in the following fields:
Field Description Description Enter a descriptive label for the Client Secret key. Expires Select a validity period for the Client Secret key. -
Click Add. The Value column will contain the Client Secret key.
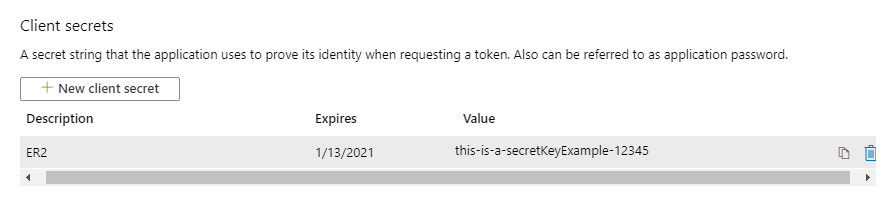
-
Copy and save the Client Secret key to a secure location.
Save your Client Secret key in a secure location. You cannot access this Client Secret key once you navigate away from the page.
Generate Personal Access Token (PAT)
Perform the following steps to generate PAT:
- With your workspace admin account, login to Databricks workspace.
- Click Settings > Developer tab.
- Next to Access tokens, click Manage > Generate new token. The Generate new token window opens.
- In the Name field, enter a label for the token.
- In the Lifetime (days) field, enter a numerical value.
- Click Personal Access Tokens toggle to enable.
- Select Other APIs.
- Under API scope(s), select All APIs or the following:
- sql
- unity-catalog
- files (if scanning Volumes)
- authentication (only if the Generate a personal access token for each scan is enabled when you set up and scan a Databricks target)
- Still under API scopes, ensure that Auto-scope tokens is not selected.
- Click Generate.
- Copy the generated token then click Done.
Add Service Principal and Required Permissions
- With your workspace admin account, login to Databricks workspace.
- Assign a service principal to workspace:
- Click your username > Settings.
- Click Identity and access tab.
- Next to Service principals, click Manage.
- Click Add service principal then select an existing service principal.
- Select entitlements Workspace access and Databricks SQL access entitlements for the service principal.
- Assign ‘Can Use’ permission to SQL warehouse:
- In the sidebar, click SQL warehouse.
- Locate the specific warehouse you want to configure.
- At the far right of its row, click the three vertical dots, and select Permissions.
- In the permissions dialog box, select the dropdown menu next to the service principal.
- Select Can use and click Save or Add to apply the changes.
- Assign permissions for Unity Catalog.
- Click Catalog then select the catalog.
- Click Permissions > Grant then choose the service principal.
- Select USE CATALOG, USE SCHEMA, SELECT, and READ VOLUME (for volumes).
- Assign token permission to Service Principle (only if the Generate a personal access token for each scan is enabled).
- With your workspace admin account, login to Databricks workspace.
- Click Settings > Advanced.
- Next to Personal Access Tokens, click the Permission Settings button. The token permissions editor opens.
- Search for the specific service principal.
- From the dropdown, select Can Use.
- Click Save.
Get the Warehouse ID
- With your workspace admin account, login to Databricks workspace.
- From the sidebar, click SQL Warehouses. Ensure you are in the correct workspace.
- In the SQL Warehouse tab, click the warehouse for which you need the ID. The warehouse’s details page opens.
- On the warehouse details page, click the Properties tab.
- Copy the warehouse ID and save it in a secure location.
Set Up and Scan a Databricks Target
- Configure Databricks Authentication Credentials.
- From the New Scan page, Add Targets.
- In the Select Target Type dialog box, select Data Warehouse > Databricks.
-
Fill in the following details:
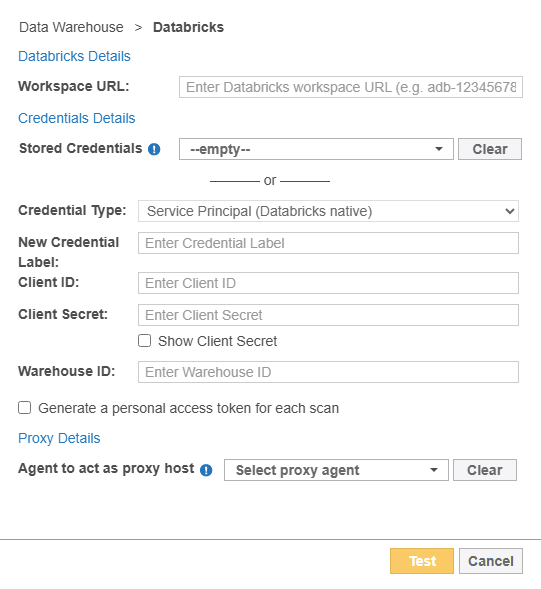
Field Description Workspace URL Enter the Databricks workspace URL.
Example: example.azuredatabricks.net
New Credential Label Enter a descriptive label for the Databricks credential set.
Credential Type If authenticating with Service Principal (Microsoft Entra ID): - From the dropdown, select Service Principal (Microsoft Entra ID).
- In the Client ID field, enter the client ID.
Example: clientid-1234-5678-abcd-6d05bf28c2bf
See Generate Client ID, Tenant ID and Client Secret Keys via Microsoft Entra for more information.
- In the Client Secret field, enter the client secret key.
Example: client~secret.key-CHvV1B5YQfr~6zDjEyv
See Generate Client ID, Tenant ID and Client Secret Keys via Microsoft Entra for more information.
- In the Tenant ID field, enter the tenant ID.
Example: tenantid-1234-abcd-5678-02011df316f4
See Generate Client ID, Tenant ID and Client Secret Keys via Microsoft Entra for more information.
- In the Warehouse ID field, enter the warehouse ID.
Example: client~secret.key-CHvV1B5YQfr~6zDjEyv
See Get the Warehouse ID for more information.
- (Optional) Enable the generate a personal access token for
each scan. Select this option only if your organization
requires workspace access via personal access tokens (PATs) so
ER2 uses the service principal to generate a PAT for each scan.
If disabled, ER2 authenticates directly with the service principal (OAuth). Recommended for most environments.
If enabled, ensure that the required "Can use" token permission is assigned to the service principal (see step 5 of Add Service Principal and Required Permissions).
- From the dropdown, select Service Principal (Databricks native).
- In the Client ID field, enter the client ID.
Example: clientid-1234-5678-abcd-6d05bf28c2bf
See Generate Client ID and Client Secret Keys via Databricks Native for more information.
- In the Client Secret field, enter the client secret key.
Example: client~secret.key-CHvV1B5YQfr~6zDjEyv
See Generate Client ID and Client Secret Keys via Databricks Native for more information.
- In the Warehouse ID field, enter the warehouse ID.
Example: client~secret.key-CHvV1B5YQfr~6zDjEyv
See Get the Warehouse ID for more information.
- (Optional) Enable the generate a personal access token for
each scan. Select this option only if your organization
requires workspace access via personal access tokens (PATs) so
ER2 uses the service principal to generate a PAT for each scan.
If disabled, ER2 authenticates directly with the service principal (OAuth). Recommended for most environments.
If enabled, ensure that the required "Can use" token permission is assigned to the service principal (see step 5 of Add Service Principal and Required Permissions).
- From the dropdown, select Personal Access Token.
- In the Client Secret field, enter the client secret key.
Example: 1a2b3c4d5e6f7g8h
See Generate Client ID, Tenant ID and Client Secret Keys via Microsoft Entra for more information.
- In the Warehouse ID field, enter the warehouse ID.
Example: 1a2b3c4d5e6f7g8h
See Get the Warehouse ID for more information.
Agent to act as proxy host Select a Windows or Linux Proxy Agent host with direct Internet access.
- Click Test. If ER2 can connect to the Target, the button changes to a Commit button.
- Click Commit to add the Target.
-
Back in the New Scan page, locate the newly added Databricks Target and click on the arrow next to it to display a list of available locations for the workspace.
- Click Next.
- On the Select Data Types page, select the Data Type Profiles to be included in your scan and click Next.
-
On the Set Schedule page, configure the parameters for your scan. See Set Schedule for more information.
-
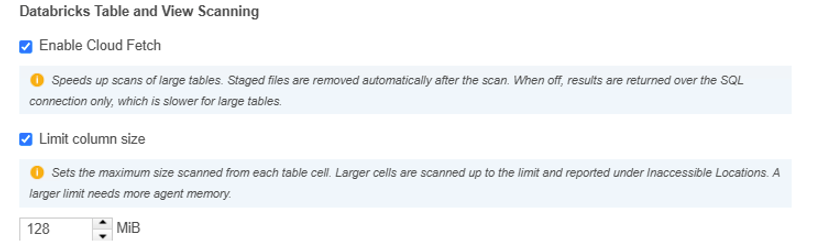
Select / deselect the Enable Cloud Fetch parameter (enabled by default). To scan rows over 100 MiB, enable Cloud Fetch. This speeds up scans of large tables. Staged files are removed automatically after the scan.
When off, results are returned over the SQL connection only, which is slower for large tables in Databricks Targets.
Databricks cannot return a table row larger than about 1 GiB, counting all its columns together. With Cloud Fetch off, the limit is about 100 MiB per row. A table with a larger row is not scanned and is reported under Inaccessible Locations.Scanning Databricks tables and views runs queries on a SQL warehouse in your Databricks workspace. Databricks bills warehouse usage for the time the warehouse is running, at an hourly rate determined by its size, not by the amount of data read. For more information, see Scan Costs for Databricks Targets. -
Select / deselect the Limit column size parameter then enter the maximum size scanned from each table cell. Larger cells are scanned up to the limit and reported under Inaccessible Locations. A larger limit needs more agent memory.
-
- Click Next.
- On the Confirm Details page, review the details of the scan schedule, and click Start Scan to start the scan. Otherwise, click Back to modify the scan schedule settings.
Edit Databricks Target Path
- Set Up and Scan a Databricks Target.
-
In the Select Locations section, select your Databricks Target location and click Edit.
-
In the Edit Databricks dialog box, enter a (case sensitive) Path to scan. Use the following syntax:
Location Path All Databricks Delta Table locations (catalogs, schemas, and tables) Syntax: Tables
Specific catalog in Databricks Delta Table Syntax: <Tables/<catalog>
Example: Tables/MyCatalog
Specific schema in Databricks Delta Table Syntax: Tables/<catalog>/<schema>
Example: Tables/MyCatalog/HR
Specific table in Databricks Delta Table Syntax: Tables/<catalog>/<schema>/<table>
Example: Tables/MyCatalog/HR/MyTable
Specific table in Databricks Delta Table Syntax: Tables/<catalog>/<schema>/<table>
Example: Tables/MyCatalog/HR/MyTable
All Databricks Views locations (catalogs, schemas, and views) Syntax: Views
Specific catalog in Databricks Views Syntax: <Views/<catalog>
Example: Views/MyCatalog
Specific schema in Databricks Views Syntax: Views/<catalog>/<schema>
Example: Views/MyCatalog/HR
Specific view in Databricks Views Syntax: Views/<catalog>/<schema>/<table>
Example: Views/MyCatalog/HR/MyView
All Databricks Volumes locations (catalogs, schemas, volumes, files and folders) Syntax: Volumes
Specific catalog in Databricks Volumes Syntax: <Volumes/<catalog>
Example: Views/MyCatalog
Specific schema in Databricks Volumes Syntax: Views/<catalog>/<schema>
Example: Views/MyCatalog/MySchema
Specific volume in Databricks Volumes Syntax: Views/<catalog>/<volume>
Example: Views/MyCatalog/MyVolume
Specific file or folder in Databricks Volumes Syntax: Views/<catalog>/<schema>/<table>
Example: Views/MyCatalog/MyFile
- Click Test and then Commit to save the path to the Target location.
Databricks Remediation
The following remediation actions are supported for Databricks Targets:
Scan Costs for Databricks Targets
When scanning Databricks tables and views, Enterprise Recon keeps the warehouse active for the duration of the scan, so the cost of a scan is essentially:
- warehouse hourly rate × scan duration
Charges are billed by Databricks (and the underlying cloud provider) to your account, not by Ground Labs. For current rates, refer to the pricing pages for Azure Databricks, Databricks on AWS, or Databricks on GCP.
What impacts the cost
- Data volume. Larger tables take longer to scan, which means longer warehouse uptime.
- Warehouse size. A larger warehouse costs more per hour but can shorten the scan; a smaller warehouse is cheaper per hour but runs longer.
- Table partitioning. Enterprise Recon scans the partitions of a partitioned table in parallel, including distributing them across multiple agents, which shortens the scan. Large unpartitioned tables cannot be parallelized, so they run longer and cost more for the same volume of data.
- Cloud Fetch. See Cloud Fetch On vs Off.
- Number of enabled data types. Each enabled data type adds inspection work for every value scanned. Enabling a large number of data types slows the scan down and therefore increases warehouse uptime and cost.
- Auto-stop. Configure the warehouse to stop automatically when idle (the default) so it does not continue to bill after the scan finishes.
- Network egress. Scan data is downloaded from Databricks to the Enterprise Recon agent. If the agent runs outside the cloud region hosting the workspace, the cloud provider may charge for data egress.
Cloud Fetch On vs Off
When the Enable Cloud Fetch parameter (enabled by default) is on, query results are staged temporarily in cloud storage and downloaded in parallel. Large tables are scanned significantly faster, which reduces warehouse uptime and therefore cost. The staged files are removed automatically when the scan finishes. Minor storage and request charges may apply for the temporary staging.
When the Enable Cloud Fetch parameter is off, results are returned over the SQL connection only. Nothing is staged, but large tables scan more slowly, which increases warehouse uptime and cost. Disabling Cloud Fetch is appropriate only where policy does not permit results to be staged in cloud storage.
Keeping Costs Down
To keep the cost down:
- Use the recommended warehouse size with auto-stop enabled.
- Keep Cloud Fetch on.
- Partition large tables where possible.
- Limit the scan scope to the catalogs, schemas, and tables that are in scope.
- Enable only the data types you need.
PRO This feature is only available in Enterprise Recon PRO Edition. To find out more about upgrading your ER2 license, please contact Ground Labs Licensing. See Subscription License for more information.